Thursday, June 9, 2011

Peter Pan Collars Tutorial

Actually I wanted to do this entry using my own words but I know my english is not as good as her so you might think it is useless for me doing it by myself fml. Well okay let's start. I found this Peter Pan Collars tutorial from Jemma youlookwellnice.


Before I start, I’ve never written anything like this before so please bear with me if I get it a little wrong! Feel free to message me about anything I’ve not quite explained properly.

Step 1: Making a pattern


This doesn’t have to be particularly fancy! I usually start quite neat with straight lines and accurate measurements but it usually ends up being finished in free hand to get that nice curve where the edges meet in the middle of the neckline.

Collars can vary in thickness and length. This particular one was 3 inches wide (including seam allowance) but I’ve made some that are nearly 5 inches wide! The most important bit is to make sure you make the straighter side long enough or else your collar won’t meet in the middle. I, however, quite like this gap. It can be filled with lace and ribbon roses ^___^

TIP: Be sure to include a seam allowance! I generally use 1/4 of inch.

Step 2: Marking the fabric


Please note! This should be done using a piece of dressmakers chalk or a fabric pen/pencil. Mine was blunt at the time and I couldn’t be bothered to sharpen it and seeing as this was only a trial collar I used a biro.

Ok, this part is important! Take your fabric that you intend to use. You need to fold it in half neatly to create a double layered piece of fabric. Line your template up with the short, straight edge of the collar (seen at the top of this picture) resting on the fold. This way when you cut out your template your half a collar will turn into a full collar!

You will need to cut out 2 pieces of fabric from your template.

TIP: To save money, collars can be backed with cheaper cotton drill to save using all of your nice fabric :)

Step 3: Cutting out


Be sure to cut accurately! I use Cath Kidston’s haberdashery scissors. I think they’re £8 a pair and they come in a beautiful floral scissor keeper. They’re very shop and have fairly long blades which are ideal for sewing. At this point, you should find a cotton that co ordinates with your fabric. Prepare a bottom bobbin using this cotton as well.

My cut outs shown here are folded in half. Yours should look like large, fabric ‘U’ shapes.

TIP: Only use your sewing scissors to cut fabric and cotton. Paper (and even some wadding and batting) can blunt scissors easily so buy a spare pair!

Step 4: The sewing!


This is the part where the seam allowance becomes very important! I usually allow a 1/4 inch seam allowance as the distance between my needle and the edge of my foot is 1/4 of an inch. This means by simply lining my fabric up with the edge of the foot, I automatically sew 1/4 of an inch in from the edge of the fabric. Refer to your manual to find out the distance of your machine.

Make sure you put your fabric wrong sides together!!!

Ok. First thing’s first. Set your machine to use a straight stitch with the needle in the centre of the foot. (My machine has a similar function but sews to the side). I usually set my tension to 4 but this can vary so be sure to practise on a scrap first!

Load your top cotton and thread your needle. Load your bottom bobbin and bring up the thread. I tend to press very lightly on my pedal as this piece has a lot of curves and bends. Pressing lightly keeps the machine fairly slow so I can keep my stitching neat.

Be sure to leave a 2-3 inch gap at the centre back of your collar to allow for turning.

Trim your seam allowance down a little and cut into your corners. Turn the collar right way round and poke out the corners gently.

Sew up the gap by hand or machine.

I then add a decorative stitch around my collars, I use the elliptical stitch pattern with the tension set just above 0. This creates a nice, tight scallop.

Here’s an example of a finished collar with ribbon attached:


That's it! She is cute and creative, right? XD So, let we all try this awesome tutorial!

Wednesday, June 8, 2011

Peter Pan Collars

I just came back from a wedding. It was actually my boyfriend's sister wedding. So I went there to lend them my hands wtf. His sister is so kind to me, so it is not nice of me if I didn't attend her wedding. Where actually my cousin getting married at the same time too T_____T. So I am a bit tired now pfftt.

I suppose to do an entry for my recent Dolly Wink Eye cream but I am too lazy now to put on full make up on my face. You don't expect me doing a review on eye make with nude face right? Plus I have one entry still in my draft HAHAHA. I wanted to publish that entry since decade ago but keep delaying it. It is actually an entry about my daily eye make. Since no one ask me 'how do you make your eyes awesome (or at least I think so wtf) like that?' but I am the one who really vain want to show off my make up skills, so I keep it safe in my draft pfftt.

Ank Rouge is one of awesome fashion line from Okarie (she is Popteen model in case you don't know). Everytime I bought and read Popteen, her sense of fashion usually caught my eyes. The more I look at them the more I realise I actually attracted to the collar style. It is called Peter Pan Collars if I am not mistaken.

Collar like this looks very sweet, nerd and honest, don't you think so? I am not really into wearing accessories like necklace when I put on awesome outfits (at least I think so too wtf) so awesome collar like this will helps my look a lot.

To my surprise, I found the tutorial in tumblr!! Yeayyy I can make it by myself. Do not worry. I'll share it with you all later XD

Wednesday, June 1, 2011

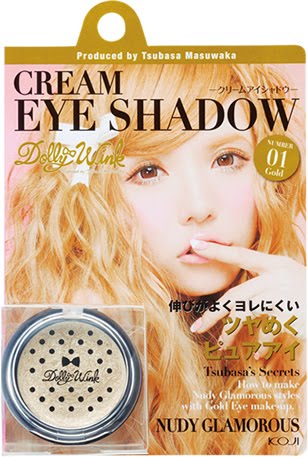
Dolly Wink Gold Cream Eye Shadow Nudy Glamorous

Yes, I spent money again. Told you my recent hobby is spending money on purchasing make up pfftt.


And today, I bought Dolly Wink Gold Cream Eye Shadow Nudy Glamorous. Haven't open the packaging yet, so no pictures from me. Picture above taken from its original website. But I did try at the shop and I think the texture is quite good.

Okay okay this entry is not a review because I haven't try it properly yet. This entry is to prove that I am not lying when I say my recent hobby is spending money on make up wtf.

Sorry this is a short post because I am running late for something actually. Till then, bye!

Saturday, May 28, 2011

Teeth Whitening

I was thinking about another product review (since my recent hobby is spending money on make up wtf) but hold first. Wait till I reach home and get tip top internet connection pfftt what a lame excuse I give this excuse every time I am lazy of posting new entry HAHAHA.

Actually I spent a lot money this month fml. That's why people tell you not to apply plastic card. But then, I think it's worth the money because it is more to investment. I went to dentist for teeth whitening. My first experience of teeth whitening is when I was 17 years old. HAHAHA it was 8 years ago!

When I was a child, I only brushed my teeth in the morning. I skipped the night part because I was lazy. Plus, I drank coke and coffee a lot. So I guess that's the reason why I have this yellow-ish teeth since my young age. Pfffttt my mother should be more strict to me in this case.

So at the age of 17, my teeth is in good condition. I mean the color. But then I keep drinking coke and coffee, and teeth whitening wouldn't last till you die wtf, so the yellow-ish come back. But I am too poor to spend my own money and do teeth whitening. So I played some trick to cover my yellow-ish teeth like cover my teeth with hands while laughing wtf.

And now I think I can afford teeth whitening because I get my salary on time every month HAHAHA, so I did it last Thursday. If you live in Miri and want to do teeth whitening like me fml, I suggest you make an appointment with Bright Smile (a block next to Bintang Mall) because they offer affordable price. Other dentist will charge more than 1k but not Bright Smile. The doctor is also friendly, makes you feel comfortable. If you want to try other dentist and they offer cheap price, make sure you ask either it is for both upper and bottom teeth or not.

The process took about 45 minutes. 3 sections for whitening. Doctor put some gel (I don't know what is that) to protect my gum. Then he put blue gel (I think that is the teeth whitener) on teeth and let the laser machine did it job for about 10 minutes for each sections. If you can't take pain, it might hurt a bit. As for me, it is not a very big problem. I can handle it.

Now my teeth is lighter than before. Not really white like toothpaste wtf but better. And the doctor also removed stains on my front tooth. I am sorry no pictures because I haven't take any latest picture after the procedure.

We can actually do-it-ourself at home. Only buy the whitening kit and it costs cheaper than the laser technique. But the result will take time.

Now, I can skip the teeth-whitening-photoshop part! HAHAHA.

Saturday, May 21, 2011

Maybelline Magnum Mascara and Kiss Me Eyebrow Highlighter

I bought mascara rarely. To be exact, my mascara was always given by my aunts or if I happened to buy it, I bought the cheapest one wtf. My previous mascara was I-don't-know-what-is-the-brand from Daiso. Bought for RM5 only. Now you know how poor I am. I bought the cheapest. Or stingy fml.


Recently I bought new mascara because previous one finished already. RM5 item use until the last drop wtf. Actually I wanted to buy Maybelline Stiletto Mascara (or something like that), which I read a review from XiaXue, but I guess it still unavailable in Sabah and Sarawak. Or maybe Malaysia T__T. I refused to buy this Maybelline Magnum Volume Express just because it is yellow. Why you didn't come in pink?

Yellow eww

This is how the brush look like

People say don't judge a book by its cover. So actually it works well for me. Picture above is my normal lashes. Not too straight and not too curl.

This is how it looks after I put on the mascara. See the difference? I don't use curler to curl my lashes just because I don't have eyelash curler wtf. I love how it works with my lower lashes. It makes my lower lashes much more obvious.


Next haul is Kiss Me Eyebrow Highlighter in Light Ash. My hair is not black anymore so light color hair must be matched with light color eyebrow too. So I've been finding this for ages because I am so jealous to see Cheesie perfect eyebrow and at last I found it HAHA. Okay, Cheesie's of course different brand but the point is eyebrow highlighter!

It should be use after you define you eyebrow with eyebrow pencil. Me? Ehem I don't define mine using eyebrow pencil or whatever because my fringe can hide anything lack on my eyebrow HAHA.

That's the color.

And this is the result. Excuse my messy eyebrow. Okay, I messed up. I overdid it HAHAHA. It is not that bad actually. It is just my skills are bad T___T. I think all girls with light hair shades need this.

And this one is just to say goodbye wtf.

Thursday, May 19, 2011

Candy Doll Alternative


Candy Doll is Japan products (in case you don't know LOL). When I say Japan, so we should know it'll be a little bit pricey when it comes to us. Especially when your country is far away from Japan in the world map wtf. And if you just poor like me, you'll freak out once you found out the price HAHAHA. Okay I am joking.

I knew about Candy Doll long time ago. Since I started put interest on Japan make up. Okay obviously after I started reading Popteen. Popteen is poisonous. All the models look really kawaii that make you want to be like them. Which lead you to use the same products as they use fml.

But... tried Candy Doll by myself, I found some alternatives you can use to get the inspired effects of Candy Doll. Especially if you are Malaysian, you can get the alternative products in affordable price.

First, I'll review on Candy Doll Cheek Color Peach Pink.
I suggest the alternative for Candy Doll Peach Pink is this IN2IT blush set in 01 Lovebird. It is actually has 3 colors. Bought this IN2IT blush set for about RM20 plus, I can't remember. Candy Doll costs me RM55 plus T_________T

The brightest pink is almost similar with Candy Doll Peach Pink. Okay maybe my eyes are playing trick on me wtf but seriously the colors are almost the same.

Not big difference right?

I used Candy Doll in the picture above. If you read my older entries and happen to find my pictures in it, which you think I put the almost similar color on my cheek, that must be my IN2IT blusher.

Second review is Candy Doll Lip Concealer. Okay this one is much simpler. Just dab a little bit of your usual concealer on your lips.

As for me, I am using Silky Girl Stick Concealer in 02 Medium as my daily concealer. So before this, I did dab a little bit of it on my lips too to make my lipstick color much obvious and nicer. SilkyGirl Concealer is just about RM19 or RM13 plus I can't remember. Candy Doll Lip Concealer costs RM55 plus T_______T.

HAHAHA I put noise on my face skin just because I don't want you all know how horrible my skin is in close up photo. But my lips are free from noise effect okay.

So I put Candy Doll Lip Concealer on the left and Silky Girl Concealer on right. Can you see any differences?

Actually Candy Doll Lip Concealer is a bit glossy. I think that's why Tsubasa Masuwaka suggests us to wipe a bit using tissue after put it on HAHAHA. Silky Girl Concealer is just matte.

But still, both of them can give you the same effect when you put on your lipstick. I used Revlon Colorburst 070 Soft Nude and Majolica Majorca PK211 Lip Gloss on my lips.

Okay that's all I think. I am really sorry if my explanation sucks. I am no good in explaining HAHA.

Tuesday, May 17, 2011

Candy Doll Haul

This will be a very long post. Yes, I am not kidding *serious face*. Guess Digi Telco kindly give me opportunity to blog about this just because I promised you guys in twitter decade ago wtf. I whined about how expensive Candy Doll but still I bought them HAHAHA. So here's my Candy Doll haul.

After calculating my salary minus car loan and other bills wtf, I decided to buy these three items.

1. Candy Doll Mineral Powder
2. Candy Doll Cheek Color Peach Pink
3. Candy Doll Lip Concealer

"Candy Doll is a cosmetic that realizes the wish that the girl wants to be cute. Sweet as fluffy. Happy as milky. It begins sparkling as made magic."

What do you mean by Happy as milky? HAHAHA sounds funny to me.

Hey ya. At last I can meet you for real :p

I read comments on how people reviewed that this mineral powder is small in size. Yes, it is small but thinking of it, I don't use it as much as I use compact powder. So I guess, the size is acceptable.

Okay. Here is Candy Doll Cheek Color in Peach Pink.

Actually I want to buy Carrot color or something like that I can't remember exactly the name but then I think my liking is tend to cuteness. Pink suits me well. Nevermind, I'll buy it next time.

And this lip concealer. My dear friend, Lisa Dearlova bought this and she likes it. So I thought I should give a try too HAHA.

I am actually want to come out with a review about it. I took pictures already but haven't finish editing them. So wait for it okay? :D

Some vain pictures HAHAHA.

Look at my cheeks! What do you think of the color? I was using Candy Doll Cheek Color Peach Pink. HAHA okay I cheat a lil bit. I did adjust the brightness a bit.

Okay. Bye.